


Security and data protection are inevitable in the software world. Most companies set up proxies to limit access to the public internet. Though it is a common practice, sometimes proxies make the developer’s life harder. As a developer, you may not be able to access the required resources without configuring proxy settings in all the places.
The How to Set Proxy for Maven? article explains how to use Apache Maven in the command line, IntelliJ IDEA, and Eclipse behind a proxy. This article explains how to configure a proxy for IntelliJ and how to prevent the annoying “Untrusted Server’s Certificate” warning dialog in IntelliJ IDEA. Though I use IntelliJ IDEA as an example, this post is applicable to all JetBrains products such as PyCharm, Android Studio, WebStorm, PhpStorm, RubyMine, GoLand, CLion, AppCode etc.
How to Set Proxy for IntelliJ
Step 1:
Open the Settings dialog from the menu File → Settings (Ctrl + Alt + S).
Step 2:
Expand the “Appearance & Behavior” group and expand the “System Settings” sub-group. Under the “System Settings” sub-group, select “HTTP Proxy”.
Step 3:
If your company has an automatic proxy configuration URL, select the “Auto-detect proxy settings” option and provide the URL. Otherwise, select the “Manual proxy configuration” option and provide your proxy settings.
Step 4:
Click the “Check connection” button and make sure the IDE is able to connect to the internet using the proxy settings. If it doesn’t work, revisit Step 3 and make sure you are using the correct proxy settings.


Step 5:
Click the Apply and OK buttons to apply the changes.
Add Server Certificate
If you are behind a proxy, most likely your company’s proxy server also overrides the SSL certificate. If it is the case, IntelliJ IDEA will not be able to verify the SSL connections and will keep showing a warning dialog with the message: Untrusted Server’s Certificate. You can simply close this message dialog and keep using the IDE but it may test your patience by popping up at random intervals. To fix this problem, you have two options:
- Adding your company’s certificate to IntelliJ – Only if you have one
- Accepting non-trusted certificates – Not a good practice but if your company doesn’t provide a certificate, there is no other option
Step 1:
Open the Settings dialog from the menu File → Settings (Ctrl + Alt + S).
Step 2:
Expand the “Tools” group and select “Server Certificates”.
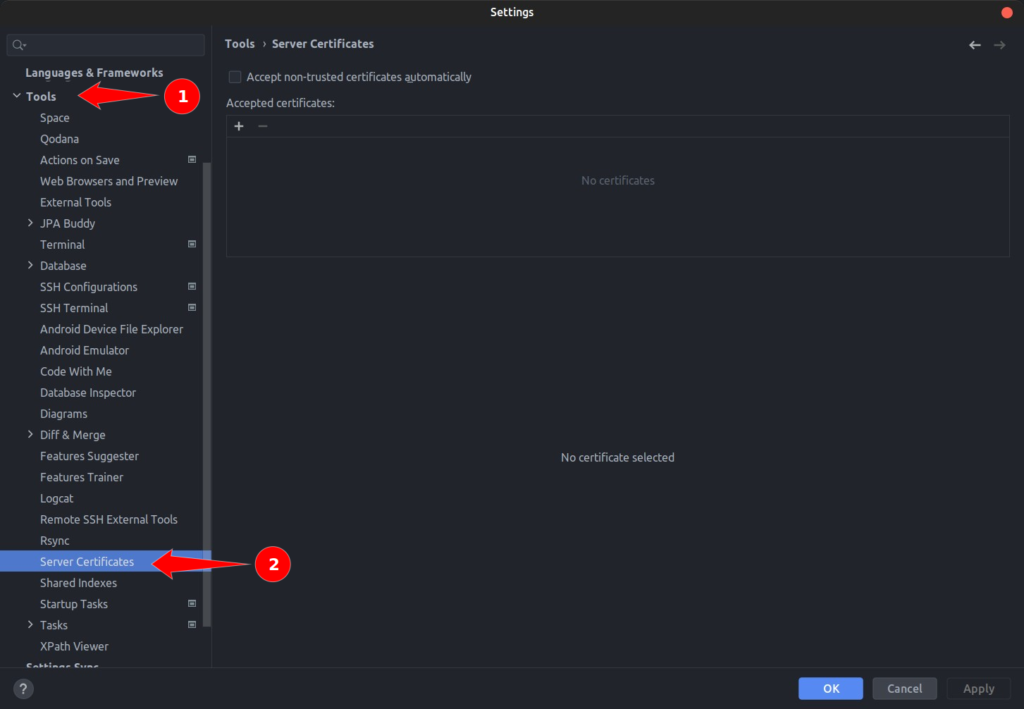
Step 3.1:
If you have the certificate, click on the + button and add the certificate.

Step 3.2:
If you don’t have a certificate, check the “Accept the non-trusted certificates automatically” option.

Step 4:
Click the Apply and OK buttons to apply the changes. After making these changes, you are free from the annoying Untrusted Server’s Certificate messages.
Have you found this article useful? Please let me know below in the comments. Knowing someone found my articles useful motivates me to write more. Also, comment below if you face any issues with following this article or getting it working. I will try my best to help you resolve the problem. The Java Helps community is also willing to help each other and grow together.


